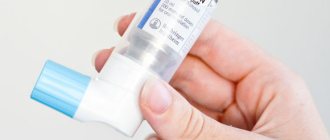
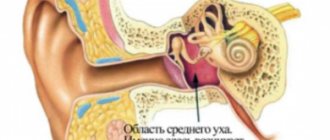
The method is based on the introduction into the middle ear cavity of antiseptic solutions (3% hydrogen peroxide solution, 0.5% dioxidine, furatsilin, chlorhexidine) and solutions of antibiotics that do not have an ototoxic effect (cephalosporins). The procedure is possible only in case of spontaneous or artificial perforation of the eardrum. To do this, use a special cannula for washing the middle ear or a blunt needle, the tip of which is inserted a couple of millimeters into the tympanic cavity. Washing the middle ear provides local therapy for purulent otitis and is part of the complex therapy of this disease.
Procedure
- the procedure is performed on an outpatient basis;
- patient position – sitting on an otorhinolaryngological chair;
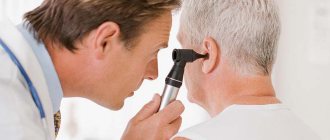
- to begin the procedure, an otoscopy is performed, the condition of the eardrum and the tympanic cavity of the middle ear is assessed over time;
- if necessary, local anesthesia is performed - a 10% solution of lidocaine or another anesthetic is instilled into the ear;
- if there is purulent exudate in the tympanic cavity, it is aspirated with a microsuction;
- then, using an ear cannula or a long blunt needle, an antiseptic or antibiotic solution is injected into the middle ear through the hole in the eardrum;
- if necessary, aspiration of the antiseptic solution is carried out using microsuction, followed by repeated washing;
- after adequate washing of the middle ear and evacuation of the antiseptic solution with a microsuction, a turunda soaked in an antiseptic or antibiotic solution is placed into the external auditory canal;
- the external auditory canal is closed with a cotton swab containing petroleum jelly;
- the procedure is repeated daily until improvement occurs.
Ear rinsing method
Ear rinsing for otitis media is a mandatory procedure that is part of complex treatment. Also, immediately before the washing procedure, the ears must be cleaned with specialized solutions and drops. How to do it right?
Everyone knows that procedures for the treatment of ear inflammation must be agreed with the attending physician .
Otherwise, you can provoke the appearance of more severe diseases, for example, meningitis or adhesive otitis media.
In this case, more complex treatment is required, so do not lead your health condition to such consequences.
Rinsing for otitis media is an indispensable remedy that not only alleviates the patient’s condition, but also relieves the hearing organ from pus and other secretions.
Most often, otitis media occurs due to the penetration of viruses and infections, so rinsing the ears also eliminates the root cause of the formation of ear disease. Therefore, this procedure has an antiseptic effect. By getting rid of pus, you eliminate a favorable environment for the development of microbes and bacteria, thereby normalizing the functioning of the hearing organ.
The rinsing procedure itself must be entrusted to an ENT doctor.
If there is no opportunity to contact a specialist in the near future, carry out the rinsing yourself, having first studied the correct technique:
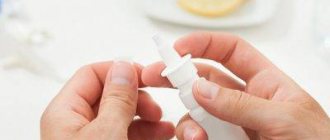
- To do this, draw the rinsing solution into a twentieth-size syringe.
- Remove the needle.
- Place the base of the syringe against the back wall of the ear canal.
- Inject one milliliter of the product into the ear canal.
- Remember that your movements should not be sudden, however, the pressure of the solution should be quite strong.
Typically, the entire washing procedure takes about 15-20 minutes. After rinsing, the patient may experience dizziness and nausea .
These symptoms will disappear after fifteen minutes.
Rehabilitation
- After the procedure, it is forbidden to immediately go out into the cold - the ears should be covered with a warm scarf;
- middle ear lavage is a component of complex therapy for otitis media, consisting of systemic antibacterial therapy, local therapy, and otorhinolaryngological procedures, such as Politzer blowing of the auditory tubes, catheterization of the auditory tubes, pneumomassage of the eardrums, etc.;
- Accurate and regular implementation of the recommendations of an otolaryngologist is the key to recovery and successful prevention of complications.
Effective solutions
Let's consider what solutions can be used during the procedure:
Furalicin solution. If rinsing is prescribed due to an inflammatory process in the ear, the doctor will recommend replacing plain water with an antiseptic with an antimicrobial effect. Furacilin solution is often used. To prepare the liquid, take 0.5 liters of water and two furatsilin tablets. The medicine must be brought to a powder state in any convenient way. then the powder is dissolved in water. In addition to removing pus and other discharges, the liquid kills pathogenic microflora and fights germs inside the ear.
Hydrogen peroxide. It is often recommended for rinsing to dissolve wax plugs. The product is used at 3% active substance content or diluted with water. After the procedure, it is necessary to rinse the ear (if we are talking about a child) to reduce the risk of an intra-ear burn. Rinsing the ear with hydrogen peroxide is carried out in the standard manner.
Water. If you do not have the necessary means to prepare the solution, you can use ordinary water brought to a boil. Before using the liquid, bring it to a temperature of 36-37 degrees. Can be used in the presence of cerumen plugs or in case of discharge accompanying the inflammatory process of the ear.
This is important: depending on the reason for the manipulation, the doctor will recommend a specific solution.
Prevention
To avoid negative consequences and the formation of sulfur plugs, you need to prevent this condition:
- Provide your ears with proper care. Cotton swabs are used exclusively for cleaning the outside of the ear. Do not try to penetrate them into the ear canal. This will provoke the pushing of sulfur even deeper. To clean the ears, wash them with soapy water and clean the area above the tragus.
- Monitor the course of ENT pathologies. If symptoms appear, you should immediately consult a doctor. Any inflammation must be stopped as quickly as possible.
- Monitor humidity parameters. This is especially true for children. The constant appearance of sulfur plugs may be the result of increased dry air.
Ear rinsing is an effective procedure that helps to cope with wax plugs and avoid unpleasant consequences. To eliminate the risk of side effects, this manipulation should be performed by a qualified ENT doctor.
How to properly rinse a child
You should not start the procedure without an idea of how to properly clean your ears. There are a number of cleaning methods, all of which require following a few simple rules:
- wash your hands with soap;
- Wash the outside of the ears with warm water and soap;
- Rinse your ears and dry them with a towel.
After this, you can begin the cleaning procedure.
Cotton buds
The most common mistake when cleaning ears is using cotton swabs, especially dry ones. The main arguments against the use of these products:
- the stick often acts like a piston, pushing the wax inward and promoting its compaction and accumulation near the eardrum;
- friction of dry dense cotton wool against the delicate skin of the ear canal causes irritation and damage, this condition reduces the skin’s ability to resist infection and threatens inflammation or the development of a fungal disease;
- poor control of the depth of penetration of the stick into the ear carries the risk of mechanical damage to the eardrum.
It should be remembered that cotton swabs were not created for ear hygiene, but for local application of various solutions to the surface of the skin and use for cosmetic purposes. To clean the ear canals, experts recommend making turundas yourself from simple medical cotton wool; with their help, you will not be able to penetrate too deeply into the ear canal, and the absence of a rigid rod will eliminate the risk of damage to the skin and membranes.
Washing
This procedure does not threaten to damage the eardrum or the walls of the ear canal, but it is not easy to carry out high-quality rinsing at home.
Washing requires the following important conditions:
- any inflammatory diseases are a contraindication to the procedure;
- the rinsing solution should not be too cold or hot;
- It is better to carry out manipulations not independently, but with the help of someone close to you.
Before starting the procedure, you need to prepare a large syringe without a needle or a rubber bulb, a special tray to collect the flowing liquid, a towel or napkins.
Carrying out washing:
- place a bath under the ear, position the head so as to ensure normal flow and outflow of fluid;
- draw the solution into the bulb, partially insert its tip into the ear canal and slowly pour in the liquid, avoiding intense pressure and directing the stream to the walls of the ear canal;
- You can repeat the washing several times, depending on the volume of the bulb or syringe;
After completing the manipulations, you should remove the remaining liquid with a cotton swab and dry your ears with a hairdryer (with warm air, without directing the air flow directly into the ear canal).
Hydrogen peroxide
To rinse your ear and remove excess wax at home, you can use a 3% hydrogen peroxide solution. Before performing the procedure, you should wipe the outer part of the ear with a cotton swab and peroxide. Then do the following:
- heat the solution to 28… 30°C;
- lie on your side and turn your head so that the auricle is oriented horizontally;
- Use a pipette to drop 3-4 drops of hydrogen peroxide into the canal;
- lie down until the solution stops hissing (2-3 minutes);
- remove the remaining solution and released sulfur.
Pharmacies sell special drops to cleanse the ears. They are instilled into the ear canal for 1-2 minutes, then by tilting the head, the liquid along with sulfur and impurities is allowed to flow out.
Such preparations contain various oils and vitamins, they have a beneficial effect on the walls of the ear canals. The use of such drugs may be contraindicated in the following cases:
- the presence of an inflammatory process in the ear;
- perforation, fresh injury or shunt of the eardrums;
- allergy to the components of the drug.
Ease of use is an undoubted advantage of pharmaceutical drops.
There are a large number of special devices for ear hygiene on the market; two main types can be distinguished:
- Vacuum. A typical example of such devices is “WaxVac”. This is a battery-powered device with silicone disposable tips. The device is safe, operates quietly and gently, has penetration depth limiters, and its small size makes it easy to take with you on trips. The device allows you not only to clean your ears, but also to remove water that accidentally gets into the ear canals. The domestic analogue is the “Clean Ears” device.
- Spiral. The most common devices of this type include “Smart Swab”. This is an easy-to-use device - to clean, you just need to insert the accessory into the ear hole and turn until the effect appears. The silicone spiral tip removes wax easily and has no traumatic effect.
An ear hygiene device, unlike cotton swabs, cleans the passages without pushing wax deeper. The advantages of all devices include safety and ease of use.
There are specially developed medications that are prescribed by a doctor strictly according to indications. If simple drops contain only oils and vitamins, then specialized products include components that dilute earwax.
Among the effective means for softening and removing wax plugs are:
- A-Cerumen. The drug was created to clean the ear canal by dissolving sulfur deposits. It does not cause irritation, and the effect begins within a few minutes after instillation.
- Otipax. This multifunctional remedy, which has antibacterial, anti-inflammatory and analgesic effects, can inhibit the production of sulfur.
- Aqua Maris Oto. The product is Adriatic sea water enriched with various ions. Used to soften wax plugs and wash out crusts.
Some types of ear medications can be used indefinitely, while others have a maximum period.
Salty water
The simplest and safest methods of ear hygiene include rinsing with a saline solution. To prepare such a solution yourself, you need to add ½ teaspoon of table salt to a glass of boiled water. The water temperature should not exceed 38° C. For a single rinse, approximately 100 ml of solution is sufficient. A syringe or rubber bulb is used.
Baby oil is made from mineral and aromatic oils; it has good lubricating properties and does not cause allergies. To flush, just pour 5 drops of baby oil into the ear canal. If you keep it inside long enough, an oil layer will form between the wax deposits and the skin, making it easier to evacuate the wax.
For ear hygiene, you can use vinegar and alcohol mixed in equal proportions. If you don’t have a pipette, soak a cotton pad in the resulting mixture and squeeze a few drops of the solution into the ear canal.
As the wax dissolves, a feeling of warmth may appear in the ear. After 3-5 minutes, let the liquid drain out. The procedure should not be repeated too often.
Warm water
Plain warm boiled water is often used to wash the ears. The algorithm in this case completely coincides with the actions when using salt water.
Baking soda
Baking soda softens sulfur deposits and helps reduce itching and irritation. To prepare the solution, add 1 teaspoon of soda to 50-70 ml of warm water and stir until completely dissolved.
Before using the soda solution, it is recommended to rinse your ears with plain warm water. Then draw the solution into a pipette (if the liquid has cooled down, hold the filled pipette in your fist until it reaches body temperature), drop 3-5 drops into the ear and hold there for no more than 10 minutes. If there is no result, you can repeat the procedure up to 4 times a day.
Most experts consider the removal of earwax to be a procedure unnecessary for the normal functioning of the hearing organs. Cleaning is used only for various disorders in the functioning of the ear glands.
The frequency depends on the chosen method and can vary from a single wash to repeating the procedure 3-4 times a day for several days (or even weeks). If there are any disturbing factors, the right step would be to visit a doctor, during whose consultation both the cleaning method and the frequency of its repetition will be chosen.
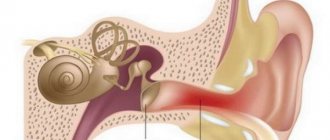
Human ears are among the so-called self-cleaning organs. That is, sulfur, which accumulates in the ear canal and protects the organ from pathogens and dirt, is able to come out on its own.
Ordinary physiological processes help her in this - chewing or speaking movements of the jaws, sneezing, coughing, etc.
But sometimes, the natural evacuation of sulfur is disrupted and then a blockage of the passage occurs - the formation of a so-called sulfur plug, which interferes with a person.
An excessive amount of dense wax in the ear canal can cause significant hearing loss, a feeling of tightness inside, pain, cause internal inflammation and other unhealthy conditions, which can be eliminated by a simple ear rinsing procedure.
• otitis, to wash away purulent discharge; • foreign bodies entering the ear canal; • cerumen blockage, as mentioned above; • formation of an air lock; • congestion, decreased hearing acuity, noise or ringing in the ears;
That is, knowledge of how to rinse the ears will be a good help in cases where there is a problem, but a visit to an otolaryngologist is impossible for some reason.
Preventive measures
Preventing the formation of wax plugs comes down to following basic hygiene rules, which do not consist of regular ear cleaning. The main problem is that many people simply do not know the cleaning algorithm and are not aware that the use of ear sticks increases the risk of the formation of such deposits in the ear canal. Accordingly, preventive recommendations are extremely simple - follow the basic tips for caring for your hearing organs. An otolaryngologist will tell you how to rinse your ears at home without harming yourself.
Ear plug (wax): how to remove at home, how to rinse the ear with hydrogen peroxide
Causes
To properly get rid of wax at home, you need to find out the cause. Let's consider the most common factors influencing the formation of wax in the ear:
High sulfur production due to metabolic failure: High sulfur production due to metabolic failure: High sulfur production due to metabolic failure: High sulfur production due to metabolic failure:
Once you have determined the cause of earplugs, you can start by removing them and then try to eliminate the factor influencing their formation.
Symptoms
Most often, the first symptom occurs when water gets into the ear. Moisture causes wax to swell and block the ear canal. The following symptoms are caused by the presence of a plug:
- Hearing in one ear deteriorates;
- The ear is blocked;
- There is noise;
- An echo occurs during a conversation (a person hears the reflection of his own voice).
When the band is near the eardrum, the person:
- yawns regularly;
- coughs periodically;
- feels nauseous;
- suffers from headaches and dizziness every day;
- feels a broken heartbeat
If not treated in time, microbes begin to develop, causing the appearance of pus from the external auditory canal and high fever.
Remedies
Before you remove an ear plug at home, you should avoid getting an ear infection, as removing earwax is dangerous (the eardrum can burst). Please note when it is not recommended to remove earwax plugs at home:
- If you have already had a ruptured eardrum;
- If you have already had problems rinsing your ears;
- If pressing on the cartilage at the tip of the ear does not cause pain;
- If there is no temperature;
- If you notice mucus discharge from your ears.
It is recommended to consult with a highly qualified specialist who will perform the procedure at a high level.
Hydrogen peroxide
Using a pen refill
Remove the ampoule from the pen, remove the cap (leave only the tube standing). Lie down in the bathtub, adjust the unbearable pressure of the water from the faucet and run it through the tube from the handle to the ear.
Pour water into your ear for three minutes (keep the pen away from your ear, do not put it in the passage). This procedure can be performed after peroxide therapy. If no result is found, use peroxide again.
Always use an antiseptic such as ocomistine or ciprofloxacin after the plug is released (4-5 drops placed in the ear).
Medication method
- Aqua Maris (this product can also be used for prevention);
- A-Cerumen;
- Remo-Wax.
- Combination product that is ordered. It consists of boiled water, soda and glycerin.
The usual method for treating wax plugs at home is to use special candles. However, not all doctors recommend this method. The candle is inserted into the affected ear and set on fire. It is recommended to consult a doctor before use.
Folk remedies
Folk remedies for removing wax plugs should be used with caution, as they can be dangerous if they cause pus or bleeding, pain in the ear or in the head. Popular remedies are not intended to treat ear diseases. Popular methods for removing ear plugs at home are:
Method How to perform the procedure Applying almond oil (five to seven drops) Heat the component and bury it warm in the affected hearing aid, insert with a swab. Baby oil
- Pour the product into the pipette;
- Place on one side and bury the oil;
- Wait 20 minutes;
- Flip the other side over and bring the fabric to your ear.
A solution of vinegar and alcohol in a one to one ratio. It has a softening property. Dissolve a teaspoon of baking soda in 50 ml of warm water.
- Select the prepared drug in a syringe or needle;
- Direct the fluid pressure so as not to damage the eardrum;
- This method is painless and can be repeated 24 hours a day.
Use a funnel-shaped piece of cloth soaked in wax.
After use, wash off the released wax particles. If your hearing does not improve after a week of rinsing your ears, consult your doctor. After the examination, the doctor will find an individual method to eliminate the problem.
Valsalva experience
It is not recommended to use this method unsupervised, but if you choose this method, you should be careful. If you feel pain, stop the procedure. Inhale the air, hold it in your lungs, grab your nose with your hand and try to exhale forcefully (under pressure, the plug comes out of the ear canal).
Prevention
Pay attention to preventive measures to reduce the risk of wax getting into the cap. Do not use cotton swabs or other thin objects. Use your index finger to clean. Rinse in a circular motion (for best results, move your jaw to simulate chewing so that the accumulated substance can escape).
Additionally, use headphones that do not fit into the ear to limit the regular flow of water into the ear canal. If you do dusty work, protect your ear canal with special equipment or earplugs. If you know how to properly clean your wax cap at home, you can prevent further damage.
Remember that excessive hygiene of the ear canal is also not beneficial.
Remember! The best way to effectively, painlessly and efficiently remove wax deposits is to consult with a highly qualified specialist.